Using a VPN on Android is simple: install a VPN app, sign in, choose a server, tap connect, and use your phone as usual.
A VPN helps secure your internet connection, hide your real IP address, and protect your privacy on public Wi-Fi, mobile data, or unfamiliar networks while traveling.
In this guide, we’ll show you how to use VPN on Android step by step, including the easiest app method, manual VPN setup, and the most useful Android VPN settings to know.
What Is a VPN on Android?
A VPN on Android is basically a secure tunnel between your phone and the internet. Instead of your Android device connecting directly to websites, apps, or online services, your connection first passes through the VPN server. Think of it like taking a private road instead of walking straight through the busiest part of town with your address written on your jacket. Not a perfect analogy, but you get the idea.
When you use an Android VPN, it helps hide your real IP address and replaces it with the IP address of the VPN server you’re connected to. So websites and apps don’t immediately see your actual location or network details in the same obvious way.
It also encrypts your internet traffic. In plain English, that means your data is scrambled while it travels between your Android phone and the VPN server, making it much harder for someone on the same Wi-Fi network — or anyone trying to snoop on the connection — to see what you’re doing.
On Android, the easiest way to use this is through a dedicated VPN app. You install the VPN app on Android, sign in, tap connect, and the app handles the technical bits in the background. No need to manually type server addresses or fiddle around with settings unless you really want to.
Why Use a VPN on an Android Phone?
Most people don’t wake up thinking, “You know what I need today? Encrypted tunneling.” Fair. But the moment your Android phone connects to a random Wi-Fi network at a hotel lobby, airport gate, shopping mall, or coffee shop, the case for using a VPN gets a lot less theoretical.
Your phone carries everything: messages, banking apps, work accounts, saved logins, browsing history, the embarrassing number of times you check the same tracking page for one delivery. A VPN adds a privacy and security layer around that connection, especially when the network you’re using is not fully under your control.
Protect Your Connection on Public Wi-Fi
Public Wi-Fi is convenient. It’s also, frankly, a bit of a jungle.
Cafes, airports, hotels, malls, libraries — they all offer free or shared networks, and many of them are used by hundreds or thousands of people every day. You don’t always know who else is connected, how the network is configured, or whether the hotspot is even the real one. “Airport_Free_WiFi_5G” could be official. Or it could be someone sitting nearby with a laptop and too much free time. Lovely thought.
A VPN helps protect your Android phone on public Wi-Fi by encrypting your internet traffic. So even if the network itself is messy, crowded, or not properly secured, your connection has an extra shield around it.
Not magic. Just sensible.
Keep Your Browsing More Private
Without a VPN, your real IP address is more visible to the websites and services you use. Your network provider can also see certain connection details, and public or shared networks may expose more than you’d like. That doesn’t mean everyone is spying on you through a dramatic hacker dashboard — life is not always a movie — but your browsing can leave a pretty clear trail.
A VPN helps reduce that exposure by masking your IP address and routing your connection through a VPN server. Websites and apps see the VPN server’s IP address instead of your actual one, which gives you a bit more breathing room online.
For everyday browsing, that can make a real difference. Especially on Android, where so many apps are constantly connecting, refreshing, syncing, pinging, and doing their little background rituals.
Use Apps and Websites More Securely While Traveling
Travel is where VPNs become especially handy. You’re switching between hotel Wi-Fi, airport Wi-Fi, restaurant Wi-Fi, mobile data, maybe even a coworking space network in a city you’ve never been to before. It’s a lot.
Using a VPN on your Android phone helps keep your connection more secure while you’re abroad or moving between unfamiliar networks. You can open your apps, check email, browse websites, manage work tools, or message people without feeling quite as exposed on every new connection.
It’s one of those things you set up once and appreciate later — usually when the hotel Wi-Fi asks for your room number, surname, shoe size, and possibly your firstborn child just to load Gmail.
Avoid Network Restrictions
Some networks don’t give you the full internet. Schools, offices, hotels, public Wi-Fi spots, and even some mobile networks may block or limit certain apps, websites, ports, or types of traffic. Sometimes it’s for security. Sometimes bandwidth. Sometimes nobody knows; it’s just been that way since 2017 and everyone’s afraid to touch the router.
A VPN can help create a more open connection by routing your traffic through a secure VPN server. Depending on the network rules, this may help you access websites or services that are restricted on that specific connection.
There’s a small but important caveat here: you should still respect local laws, workplace policies, school rules, and service terms. A VPN is a privacy and security tool, not a permission slip to ignore every rule on the wall. But when a network is unnecessarily restrictive or unreliable, using a VPN app on Android can make your connection feel a lot less boxed in.
How to Use VPN on Android Step by Step
Here’s the good news: learning how to use VPN on Android step by step doesn’t require you to understand encryption protocols, server routing, or any of that behind-the-curtain wizardry. You don’t need to “configure a tunnel” like you’re in a spy film. Most of the time, it’s just an app.
Install. Open. Connect.
That’s the shape of it.
Step 1: Download a VPN App for Android
The easiest way to use a VPN on Android mobile is to install a trusted VPN app from Google Play. This is the cleanest route for most people because the app handles the technical setup for you — server details, connection settings, protocols, the lot.
To get started, download GatewayVPN from the Google Play Store and install it on your Android phone.


Once it’s installed, you’ll see the app on your home screen or in your app drawer, just like any other Android app. No manual setup needed at this point. No digging through five layers of settings menus either, which is always a small mercy.
Step 2: Open the VPN App
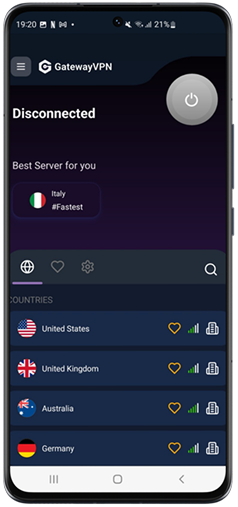
After installation, open the VPN app.
From there, you’ll usually need to sign in or create an account. If you’re using GatewayVPN for the first time, follow the on-screen steps to log in, set up your account, or start your trial if available.
This part should feel familiar. Email, password, maybe a verification step. The usual modern-app dance.
Once you’re inside the app, you’re ready to choose where your VPN connection will run through.
Step 3: Choose a VPN Server and Connect
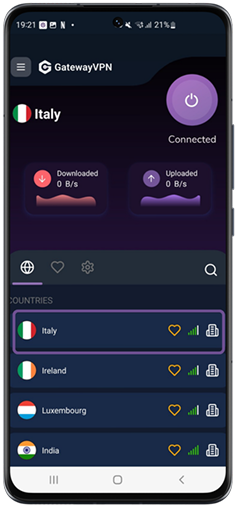
Next, choose a VPN server.
You can use the recommended or fastest server, which is usually the best option for everyday browsing, messaging, and general Android phone use. Or, you can manually choose a specific country or location if you want your connection to route through that area.
GatewayVPN can automatically suggest the best server for your connection, or you can choose from the available server locations yourself. That means you don’t have to guess which one is fastest. Handy, because nobody wants to spend ten minutes playing “server roulette” just to check an email.
To connect, simply tap the server you want to use. GatewayVPN will start connecting right away.
The first time you use a VPN app on Android, your phone may ask for permission to set up a VPN connection. This is normal. Android shows this prompt because the app needs your approval before it can route your internet traffic through the VPN.
Approve the request, and the VPN will connect to the selected server.
Once connected, Android may show a small key icon or VPN symbol in the status bar at the top of your screen. That little icon is your sign that the VPN is active. Tiny icon, big job.
Step 4: Use Your Android Phone Normally
After the VPN connects, you can use your Android phone the way you usually do.
Open Chrome. Check your email. Use your banking app. Scroll social media. Watch videos. Message friends. Play games. Whatever you normally do on mobile, you can keep doing it while the VPN runs quietly in the background.
That’s kind of the beauty of it. A good Android VPN shouldn’t make your phone feel complicated. It should just sit there, doing its work, without constantly waving for attention like a needy pop-up.
Step 5: Disconnect When Needed
When you no longer need the VPN, open the VPN app and tap Disconnect.
That’s all. Your Android phone will go back to using your regular internet connection, whether that’s Wi-Fi or mobile data.
You might disconnect when you’re done using public Wi-Fi, when you want to troubleshoot an app, or when you simply don’t need the VPN running for a while. And later, when you want protection again, open GatewayVPN and tap connect. Back on. Nice and simple.
How to Use a VPN Client on Android
The phrase “VPN client” sounds more technical than it needs to. Slightly corporate. Slightly like something you’d find in a dusty IT manual. But on Android, a VPN client simply means the tool your phone uses to connect to a VPN service.
And you’ve got two main ways to do it.
Option 1: Use a VPN App
For most people, this is the sensible option. A VPN app on Android works as the VPN client, but without making you manually wrestle with server addresses, certificates, ports, protocols, or random configuration files that look like they were written for a submarine.
Apps like GatewayVPN handle the setup automatically. You install the app, sign in, choose a server, and tap connect. The app takes care of the connection settings in the background, which is exactly how it should be. Simple, clean, not a whole afternoon project.
This is the easiest way to use a VPN client on Android if you’re using your phone for everyday browsing, public Wi-Fi protection, travel, streaming apps, messaging, or general privacy.
No manual typing. No guessing the VPN type. No copying a server address from an email and wondering if you missed a character. Lovely.
Option 2: Use Android’s Built-In VPN Settings
Android also has built-in VPN settings, and yes, you can use them to add a VPN connection manually. This is usually more common for workplace VPNs, business networks, or advanced users who already have the exact setup details from their provider or IT team.
To use Android’s manual VPN client settings, you typically need details like:
- VPN type
- Server address
- Username
- Password
- Certificate or configuration details
The exact menu names can vary depending on your Android phone. A Samsung phone may label things a little differently than a Google Pixel, Xiaomi, OnePlus, or Motorola device. Because Android likes to keep us humble.
Manual setup works, but it’s not the friendliest route for casual users. One wrong setting and the connection simply won’t work, usually without giving you a clear reason why. Very helpful. Very Android.
For most Android users, a VPN app is easier, faster, and less error-prone than manual setup. It gives you the same basic goal — a secure VPN connection — without turning the process into a mini networking exam.
How to Set Up VPN Manually on Android
Sometimes you don’t want the app route. Or maybe you can’t use it because your workplace gave you manual VPN details and told you, with great confidence, “just add it in settings.” Always a promising sentence.
Android does let you set up a VPN manually. It’s not difficult, exactly, but it does need the right information. If one detail is wrong — server address, VPN type, username, certificate — the connection may fail without much of an explanation. A bit annoying, but manageable.
Manual Android VPN Setup Steps
Here’s the general path for setting up a VPN manually on Android:
- Open Settings on your Android phone, go to Network & Internet or Connections.
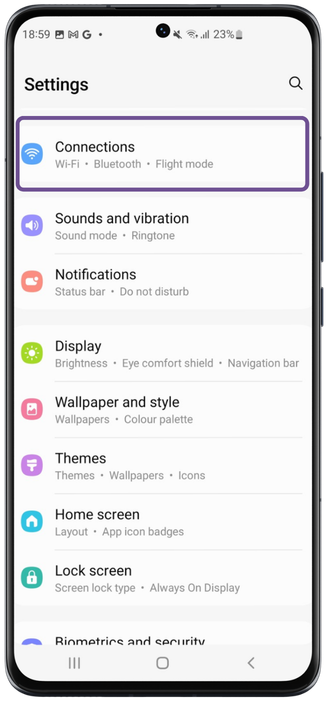
- Then tap on More Connection Settings.
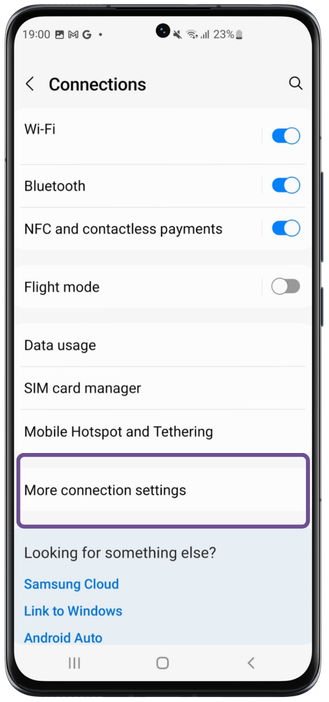
- Tap VPN.
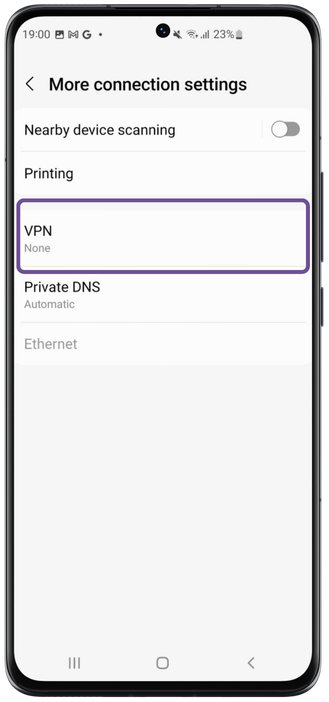
- Tap Add VPN or the + icon.
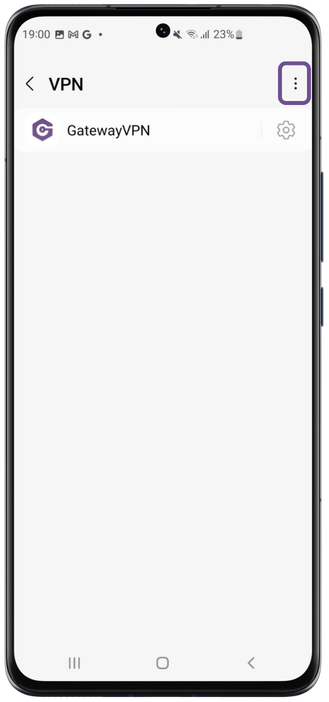
- Enter the VPN details from your provider, and Save the VPN profile.
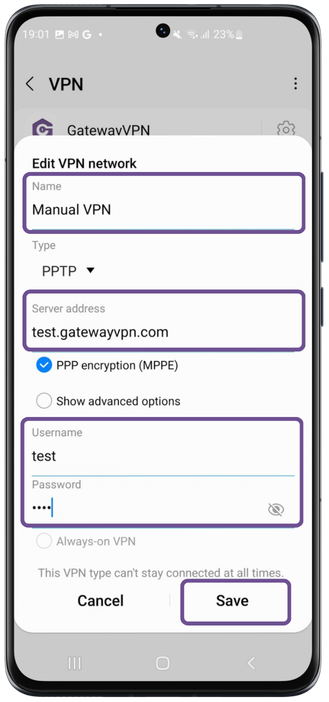
- Tap the VPN profile and connect.
The exact wording depends on your phone. Samsung may use Connections, Google Pixel may show Network & Internet, and brands like Xiaomi, OnePlus, and Motorola can shuffle the menu names around a little. Same destination, different hallway.
You’ll usually need details such as the VPN type, server address, username, password, and sometimes a certificate or extra configuration file. These details should come from your VPN provider, employer, school, or whoever manages the VPN connection.
When Should You Use Manual Setup?
Manual setup is useful when you already have specific VPN details and you know exactly what you’re connecting to.
This is common with work VPNs, business networks, university systems, or private servers. For example, your company might give you a server address and login so you can access internal tools from your Android phone. In that case, Android’s built-in VPN client does the job.
Advanced users may also prefer manual setup because they want more control over the connection. Fair enough. Some people like flipping the switches themselves.
When Should You Use a VPN App Instead?
For most personal users, a VPN app is the better choice.
A dedicated VPN app makes it easier to choose servers, switch locations, change protocols, check connection status, and disconnect when needed. You don’t have to manually enter server details or troubleshoot mysterious settings when something breaks.
With an app like GatewayVPN, the setup is handled for you. Open the app, choose a server, tap connect, and you’re done. Much less fiddly.
So, manual setup has its place — especially for work or advanced configurations — but if your goal is everyday privacy, public Wi-Fi protection, or a smoother Android VPN experience, using a VPN app is usually the path of least resistance.
How to Know If Your VPN Is Working on Android
A VPN shouldn’t feel mysterious once it’s turned on. You tap connect, the app says connected, and life continues. Still, it’s worth doing a quick check the first time — partly for peace of mind, partly because Android can be a little dramatic with network permissions now and then.
Here are the easiest ways to confirm your VPN is actually working on your Android phone.
Look for the VPN Icon
When your VPN is connected, Android usually shows a small key icon or VPN symbol in the status bar at the top of the screen.
It’s tiny. Easy to miss. But it’s one of the clearest signs that your Android VPN connection is active.
You can also swipe down from the top of the screen to open your notification panel. In many cases, Android will show a VPN notification there too, telling you that a VPN app is running in the background.
If you see the icon and your VPN app says Connected, that’s a good start.
Check Your IP Address
Another simple test: check your IP address before and after connecting.
Before you turn on the VPN, open Chrome on your Android phone and search “what is my IP”. Take a quick look at the IP address shown.
Then open your VPN app, connect to a server, and search “what is my IP” again.
If the VPN is working, your IP address should change. The location may also show the country or city of the VPN server instead of your actual network location. That’s the VPN doing its thing — swapping the “front door” people see online.
Not glamorous. Very useful.
Test Your Connection
Finally, just use your phone for a minute.
Open a few websites. Refresh your email. Try a messaging app. Launch a streaming app or social media app. Everything should load normally after connecting to the VPN.
If websites stop loading, apps hang, or your connection feels painfully slow, the VPN may still be connected but the server might not be the best fit. Try switching to another server, use the recommended/fastest option, or reconnect to your Wi-Fi or mobile data.
A working VPN should protect your connection without making your Android phone feel broken. That’s the bar. A reasonable one, honestly.
Best VPN Settings to Use on Android
Once your VPN is installed and connected, you could leave everything on default and probably be fine. Honestly, that’s what most people should do.
But a few settings are worth knowing, especially if you want better speed, stronger protection, or fewer “why is this app acting weird?” moments. Android gives you quite a bit of control, and a good VPN app makes that control less painful to use.
Use the Fastest Server for Daily Browsing
For everyday use, the fastest or recommended server is usually the best choice.
Why? Because nearby servers often give you better speed, lower delay, and a smoother connection overall. If you’re just browsing, checking emails, using social apps, or doing normal Android phone stuff, you probably don’t need to manually pick a faraway server unless you have a specific reason.
With GatewayVPN, you can use the recommended server option to connect to the best server for your connection. Less guesswork. Fewer random speed drops. No need to test ten different locations like you’re tuning an old radio.
For daily browsing, simple wins.
Use Always-On VPN for Extra Protection
Android supports Always-On VPN, which helps keep your VPN active automatically. When this setting is enabled, your phone tries to keep the VPN running in the background so your connection stays protected more consistently.
This is especially useful if you often switch between Wi-Fi and mobile data, or if you connect to public networks throughout the day. Coffee shop Wi-Fi, airport Wi-Fi, hotel Wi-Fi — the usual suspects.
GatewayVPN supports Always-On VPN, so you can keep your Android VPN connection active without opening the app every time you unlock your phone. It’s a nice set-it-and-forget-it feature, particularly if you don’t want your phone briefly slipping back to an unprotected connection.
Tiny setting. Big comfort.
Enable Split Tunneling If Needed
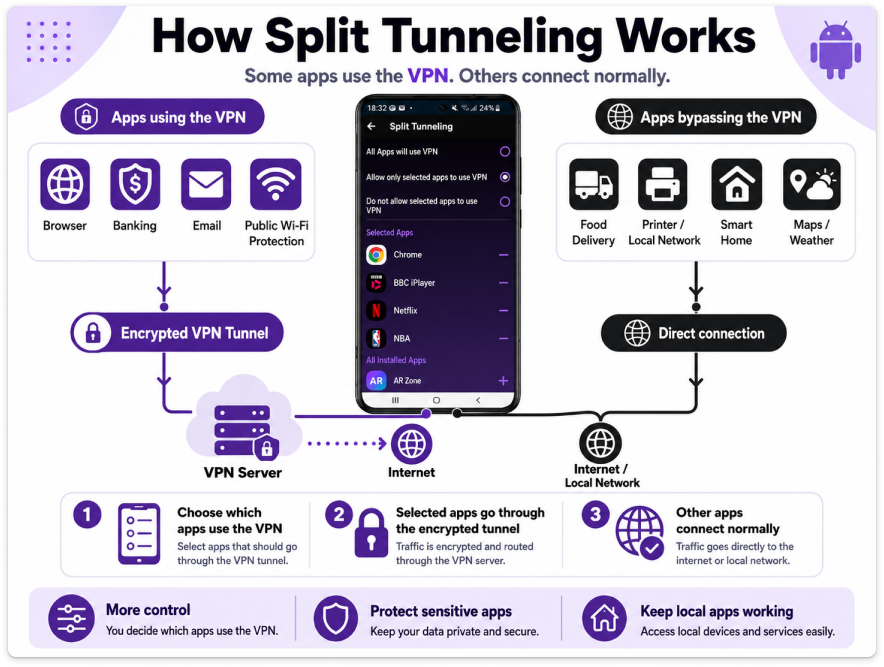
Split tunneling is one of those features that sounds complicated until you actually use it.
Basically, it lets you choose which apps use the VPN and which apps connect normally through your regular internet connection. So, for example, you might want Chrome, messaging apps, or banking apps to use the VPN, while leaving another app outside the VPN if it doesn’t behave well with encrypted connections.
Not every app loves VPNs. Some banking apps, local delivery apps, or region-sensitive services can get a bit fussy. Split tunneling gives you a workaround without turning the VPN off completely.
With GatewayVPN, enabling split tunneling can help you keep protection where you want it, while letting specific apps bypass the VPN when needed. More control, less fiddling.
Switch Protocols If Your Connection Is Unstable
If your VPN connection feels slow, keeps dropping, or refuses to connect on a certain network, switching protocols can help.
A VPN protocol is the method your app uses to create the secure connection. You don’t need to memorize the technical differences — unless that’s your thing, in which case, respect — but it helps to know that some protocols work better on certain networks than others.
GatewayVPN supports modern VPN protocols such as WireGuard and OpenVPN. WireGuard is often a strong choice for speed and everyday performance, while OpenVPN can be useful when you need a reliable alternative on trickier networks.
So if the connection feels unstable, don’t panic. Try another server first. Then, if needed, switch protocols inside the VPN app settings. Sometimes that one small change clears the whole thing up, like restarting a router but with less crawling under a desk.
Common Problems When Using a VPN on Android
Most VPN problems on Android are not catastrophic. Annoying? Absolutely. But usually fixable with a few boring-but-effective steps: reconnect, switch servers, update the app, or check whether Android is quietly strangling the app in the background to “save battery.” Very helpful, Android. Thanks.
Here are the most common issues and what to try first.
VPN Won’t Connect
If your VPN won’t connect on Android, start with the basics before assuming something is broken. Sometimes the issue is just a weak Wi-Fi signal, mobile data acting up, or one stubborn server having a bad day.
First, check that your internet connection works without the VPN. Open a browser or another app and see if pages load normally. If your regular connection is already struggling, the VPN won’t magically fix it.
Then try these quick fixes:
- Restart the VPN app.
- Try a different VPN server.
- Update the VPN app from Google Play.
- Switch from Wi-Fi to mobile data, or the other way around.
- Restart your Android phone.
Yes, “turn it off and on again” still earns its place in the hall of fame. It works more often than it should.
Internet Is Slow After Connecting
A VPN may slightly affect your speed because your traffic is encrypted and routed through a VPN server. That’s normal. But it shouldn’t make your Android phone feel like it’s using internet from 2009.
If your connection slows down too much, choose a nearby server or use the fastest server option in your VPN app. The closer the server, the better your speed usually is. Not always, but often enough.
You can also try changing the VPN protocol. With GatewayVPN, for example, switching between modern protocols like WireGuard and OpenVPN may help improve speed or stability depending on the network you’re using.
A few more things to try:
- Avoid overcrowded public Wi-Fi networks.
- Disconnect and reconnect to the VPN.
- Close apps running heavy downloads in the background.
- Move closer to your router if you’re on Wi-Fi.
Sometimes the VPN isn’t the villain. Sometimes the café Wi-Fi is just held together with tape and hope.
Some Apps Don’t Work With the VPN
Every now and then, an app gets fussy when a VPN is turned on. Banking apps, local services, delivery apps, games, and some streaming platforms may behave differently when your connection is routed through a VPN server.
Start simple: close the app and open it again. If that doesn’t help, clear the app cache from your Android settings. It’s not glamorous, but cached data can occasionally cause weird loading or login issues.
You can also try another VPN server. Some apps may block or limit certain IP addresses, while others work fine with a different server.
If your VPN app supports split tunneling, that’s often the cleanest fix. Split tunneling lets you choose which apps use the VPN and which apps connect normally. So you can keep the VPN on for browsing, messaging, or public Wi-Fi protection, while letting one difficult app bypass the VPN.
A bit of compromise. Everyone calms down.
VPN Keeps Disconnecting
If your VPN keeps disconnecting on Android, the problem may not be the VPN server at all. Android can be aggressive with battery saving, background restrictions, and app sleep settings. Great for battery life. Less great for apps that need to stay connected.
First, check whether battery optimization is enabled for your VPN app. If it is, disable it so Android doesn’t keep shutting the VPN down in the background.
You should also check background app restrictions. Some Android phones — especially Samsung, Xiaomi, OnePlus, and other heavily customized versions of Android — have extra battery management settings that can interfere with VPN apps.
Try these fixes:
- Disable battery optimization for the VPN app.
- Allow the VPN app to run in the background.
- Turn on Always-On VPN for extra protection.
- Update the VPN app.
- Restart your phone.
With Always-On VPN enabled, your Android phone can keep the VPN active more consistently, even when you switch networks or lock the screen. It’s a small setting, but it saves you from constantly checking whether the VPN quietly dropped out while you weren’t looking.
Is It Safe to Use a VPN App on Android?
Yes — using a VPN app on Android is safe when you choose a provider you can actually trust.
That last part matters. A lot.
A VPN handles your internet connection, so you don’t want to install some random free app with a blurry logo, five spelling mistakes in the description, and permissions that look like it wants to move into your house. A good VPN should protect your data, not become the thing you need protection from. Obvious, but worth saying.
When choosing a VPN app for Android, look for the basics:
- No-logs policy: The VPN should not keep records of your browsing activity.
- Strong encryption: Your connection should be protected with modern encryption, not outdated security.
- Reliable VPN protocols: Look for trusted protocols like WireGuard and OpenVPN.
- Clear privacy policy: If the privacy policy reads like fog in legal form, that’s not a great sign.
- No suspicious permissions: A VPN app shouldn’t ask for access to things it clearly doesn’t need.
- Good customer support: Because when something breaks, and eventually something always gets weird, you want help from a real support team.
GatewayVPN is built to make VPN protection simple on Android, with secure encryption, fast servers, and an easy one-tap connection. You don’t need to babysit the app or understand every technical detail behind it. Install it, connect, and let it do the quiet work in the background.
Still, a small reality check: a VPN is not a magic invisibility cloak. It helps secure your connection, masks your IP address, and improves privacy, but it won’t protect you from everything online. Phishing links, weak passwords, shady downloads, and suspicious apps are still bad news. The VPN helps with the connection side of privacy and security — the rest still needs a bit of common sense.
Free VPN vs Paid VPN on Android
Free VPNs are tempting. Of course they are. Nobody sees a “free” button and thinks, “No thanks, I’d rather pay.” But with VPNs, especially on Android, free can come with trade-offs that aren’t always obvious at first glance.
Sometimes the trade-off is speed. Sometimes it’s privacy. Sometimes it’s a screen full of ads that makes the app feel like a slot machine. Not ideal.
Free VPNs
A free VPN on Android may be fine for very light, occasional use, but it usually comes with limits.
You may get slower speeds, especially during busy hours. Some free VPNs also cap your data, which means you can run out after browsing, streaming, or downloading for a short while. Server choice is usually limited too, so you may only have access to a small number of locations.
Then there are the ads. Lots of them, sometimes. Pop-ups, upgrade prompts, banners — the whole parade.
The bigger concern, though, is privacy. Not every free VPN has strong privacy practices, and some may collect more data than you’d expect. Since running VPN servers costs money, a free provider has to pay for the service somehow. That doesn’t automatically mean something shady is happening, but it does mean you should read the privacy policy carefully. Boring, yes. Important, also yes.
Paid VPNs
A paid VPN usually gives you a cleaner and more reliable Android experience.
You typically get better speeds, more stable servers, more server locations, and fewer restrictions on daily use. Paid VPNs are also more likely to offer stronger privacy features, modern protocols, and proper support when something goes wrong.
That support part matters more than people think. When your VPN won’t connect before a trip, or an app suddenly stops working, you don’t want to be shouting into the void of a forgotten help page from 2021.
A paid VPN app also tends to feel smoother on Android. Fewer ads. Fewer data limits. Better connection stability. Less nonsense overall.
For casual testing, a free VPN might be enough. But for everyday privacy, public Wi-Fi protection, travel, or regular Android use, a trusted paid VPN is usually the better bet.
Conclusion
Using a VPN on Android is much easier than it sounds at first. No secret settings. No technical maze. Just a few taps and you’re good.
Download a trusted VPN app, open it on your Android phone, choose a server, and tap connect. Once the VPN is active, you can use your browser, apps, streaming platforms, social media, games, and everyday mobile tools like normal — only with a more secure connection running in the background.
That’s the whole rhythm: install, connect, carry on.
And if something feels off, you can switch servers, use the fastest server option, adjust your protocol, or turn on features like Always-On VPN and split tunneling. Handy little tools, especially if you use public Wi-Fi often or travel with your Android phone.
Download GatewayVPN for Android and secure your connection in one tap.


 By Nolan A. Pierce
 By Diego Castillo